
I recently acquired a very cool “Maker Kit” from the LittleBits Company. This particular kit is called the “Star Wars” Droid Inventor Kit. The kit comes with 30-plus pieces, which allows any maker to create, build, and play with a droid (similar to R2-D2) that they end up making themselves. In addition to the acquisition of this interesting Maker Kit, I also decided to use a few household items to create an obstacle course for my soon-to-be-made droid. The household items that I grabbed included some blue plastic cups and some rolls of bathroom tissue. The LittleBits kit comes with a large card that says “START HERE” on it. The very first step in creating a droid is to build a simple circuit (using what LittleBits calls “Bits”). This simple circuit ultimately becomes the “brain” of one’s droid.


The second major step in building a functional droid is to download the official LittleBits Droid Inventor App from either the Apple App Store or from Google Play. I did this on my iPhone 7. The app’s interface looks like this:
Once a person has started the app and tapped on “JOIN US”, the app offers Training Missions from the beginning. This app guides users along, step-by-step, as they build their droid from just a collection of six main circuits to a full-blown droid (over twelve inches tall). There are sixteen missions in total, but building the droid can be done in four missions. The overall process is not very difficult, but I had to watch some of the in-app videos multiple times, as well as try, fail, and try again in a few different instances.
Now I will go over the steps that I took to build my own droid:
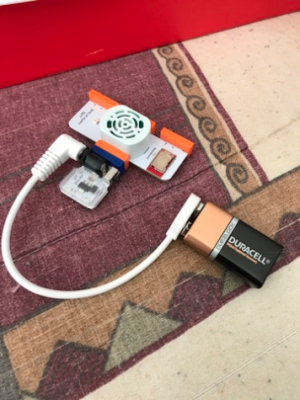
Step 1: First I located all six Bits in my Droid Inventor Kit. The app helps you to identify each one. They are color-coded and shaped differently, making it rather easy to identify each Bit. In the first mission, I put together the Control Hub, connecting three Bits and a 9-volt battery.
Step 2: I followed the Mission 2 instructions on the app, which called for the creation of the Driving Circuit. During this process, I gathered and snapped together some of the green-coded droid parts. I also added a small wheel to the droid during this process, and tested the wheel’s ability to move, wirelessly between my phone and the “growing droid”. I could now move this wheel with my app! Mission 2 completed.


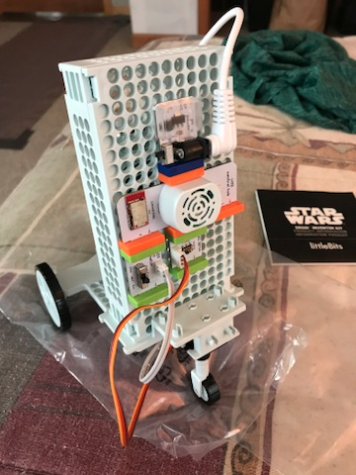
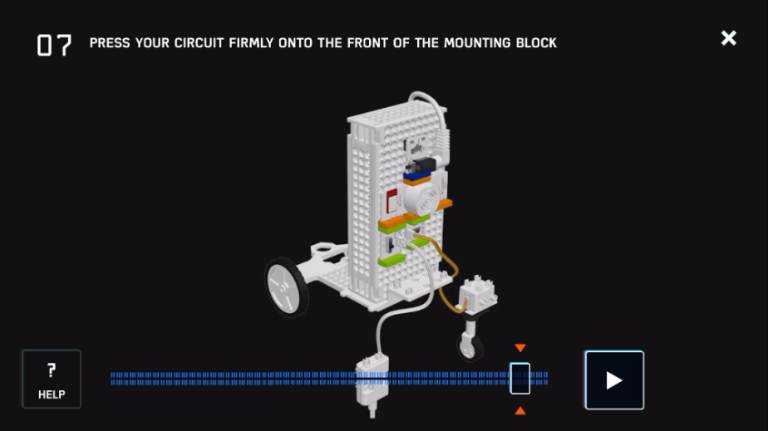
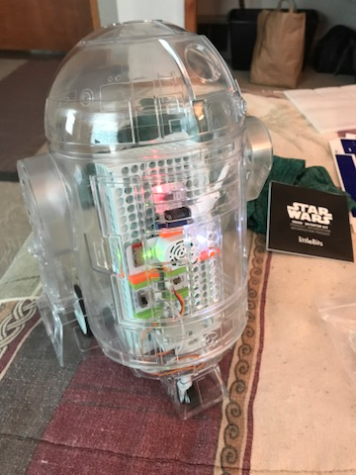
Step 3: Mission 3 was a step-by-step process that helped me build the inner body of my droid, also known as the Internal Structure. The app’s missions include these great illustrated videos, which allow users to replay them as many times as needed. I replayed these short videos several times to make sure that I was connecting everything properly. First I gathered the new droid parts, and placed the 9-volt battery into an included battery mount. Then, I grabbed a larger mounting block and connected it to an equally large wheel frame. The two connected together at a certain spot with an obvious “click”. In the next step, I attached pieces called the drive gear and the axle to the wheel frame. After that, I had to press hard and attach the two large wheels that came with the kit onto each end of the axle. Finally, I pressed my entire circuit unit firmly onto the “front” of the mounting block. The results of Mission 3 looked like this:
 Step 4: In the fourth step, also known as Mission 4, I built the protective outer body of my droid. I had to attach the body base to the bottom of the mounting block, then click the large body onto the body base. Next, I snapped a front panel onto the body. After that, I had to firmly attach a right leg and a left leg onto the sides of my droid’s body. The final piece of the body that needed to be attached was my droid’s “head”. I had to “click” the head onto the top of my droid’s body. Lastly, it was time to power my droid on and test its ability to move and drive! In order to connect a Smartphone to a droid, a person has to place the Smartphone near the droid’s Control Hub Bit. Then the app allows the person to tap on “CONNECT”, and for me, it connected nicely every time.
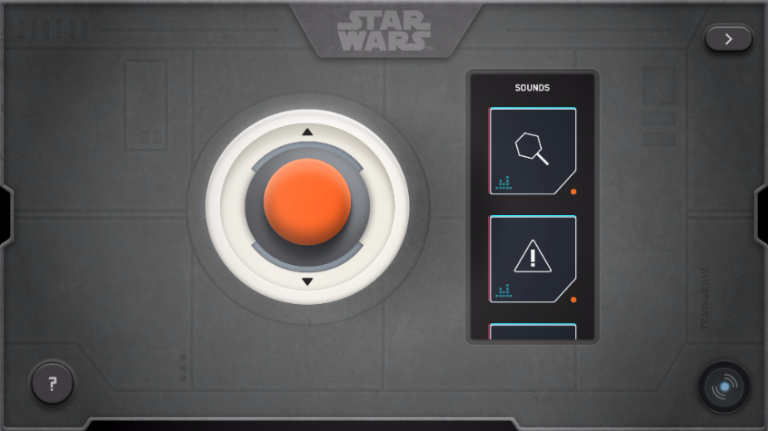
 Step 5: Step 5 of the process was test-driving my new droid and making an obstacle course for it. The app has a nice interface to control one’s droid. The screen has a virtual joystick to move the droid in basically every direction, and it also includes a large variety of sound buttons to tap on to make the droid beep, whistle, and hoot. It looks like this:
The final step of my process, and the process that would be fun for all young students, was repurposing some household items to make them obstacles for a Droid Obstacle Course. This time, I took four blue plastic cups and four rolls of bathroom tissue and placed them on my floor. I placed them in a way to make a curving “road”, putting these items in pairs, with the purpose of having my droid drive in between each pair of items. The final goal for the droid was to hit a blue cup at the end of the “road”. In a classroom setting, it would be fun and interesting to bring in many household items, and tell kids that their goal was to create a Droid Obstacle Course with as many twists and turns as they could imagine.


My Droid Obstacle Course Video:
A Note on Multimodal Elements:
My multimodal elements included relevant links to LittleBits, the Apple App Store, and Google Play, all of which are needed if someone wants to attempt the same thing that I did. My own photos were visual aids accompanying my process for this project, and then I also included my droid obstacle course example video.
